Connect your workspace
These steps connect your workspace to deeploi and protect your team's email. Give deeploi admin access first: the email security and SSO steps both require it.
How do I give deeploi admin access?
Giving deeploi admin access lets deeploi create and remove employee accounts, manage app licenses, and handle workspace settings automatically. Select your workspace below.
Adding deeploi as a Global Administrator to Microsoft 365 takes about 10 minutes. You must already be a Global Administrator yourself to grant admin rights to others.
The video below walks through the full setup.
What the video covers
- Navigating to user management. Opening admin.microsoft.com and finding the user addition flow.
- Creating the deeploi admin account. Entering the required user details and setting the admin email for password delivery.
- Assigning the Global Administrator role. Selecting the correct license and role settings.
- Completing the invitation. Reviewing and finishing the account creation.
Steps
-
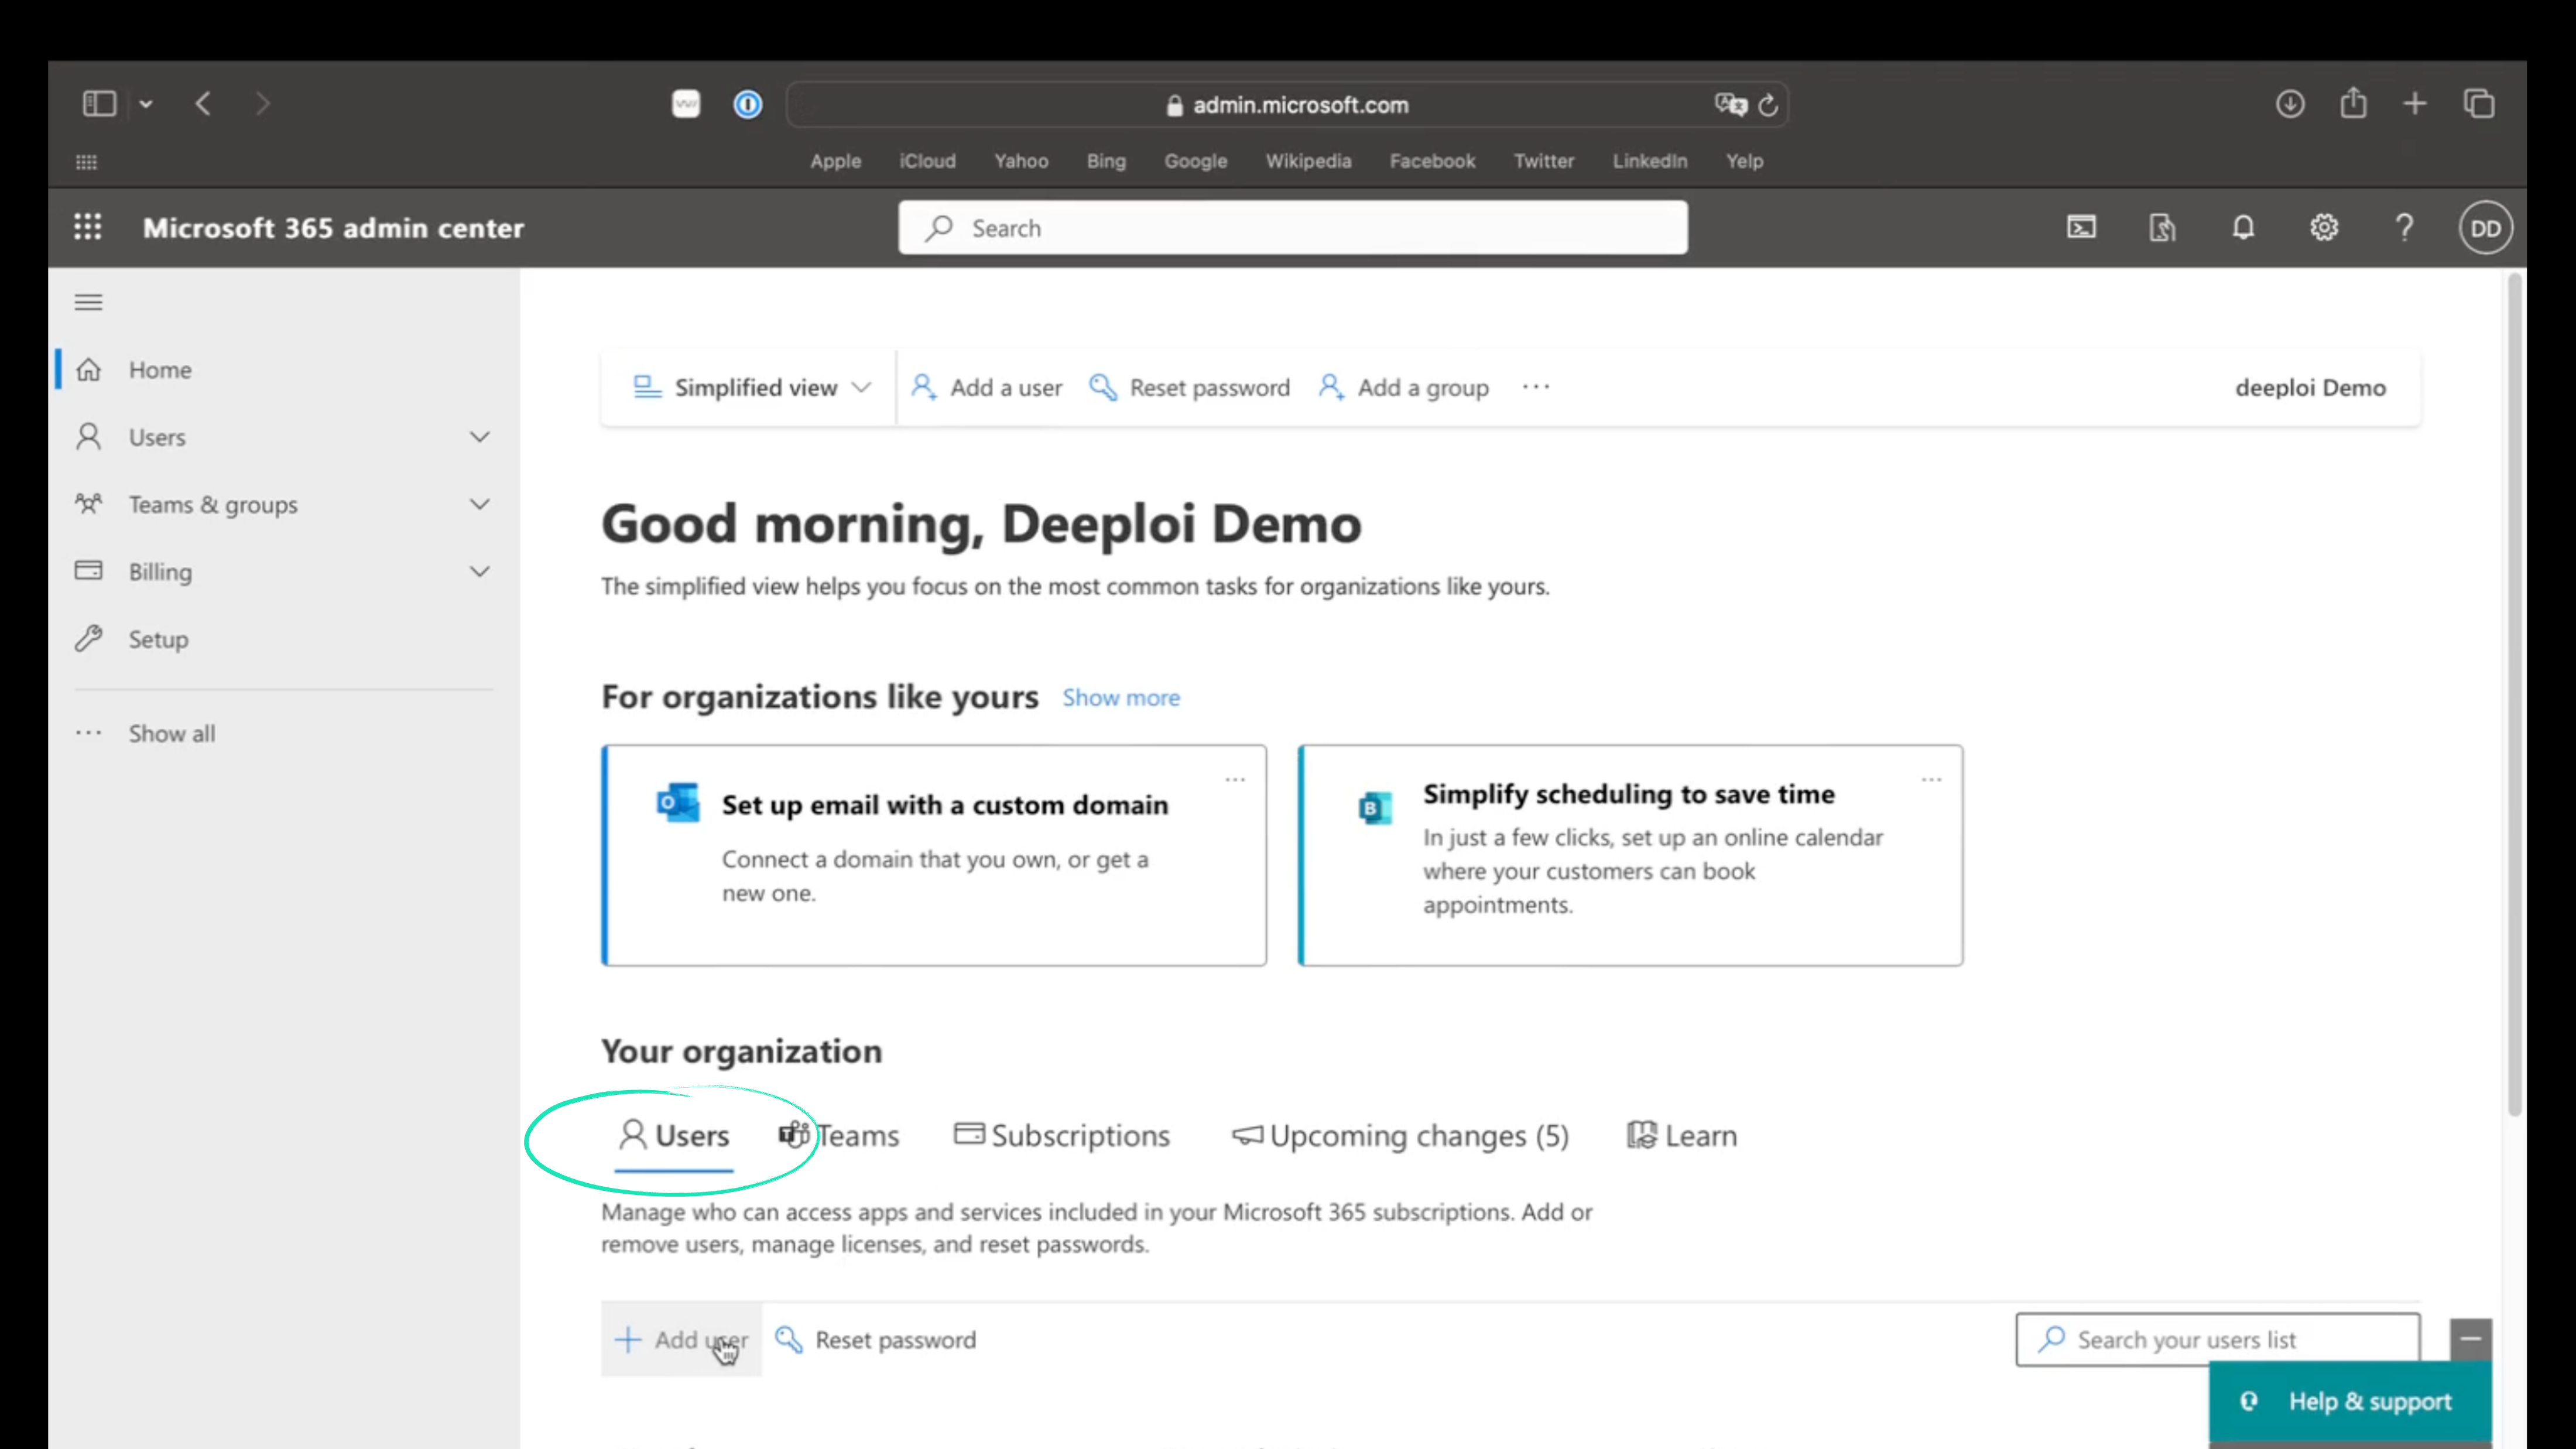
Go to admin.microsoft.com and sign in with your credentials.
-
Click + Add user.
-
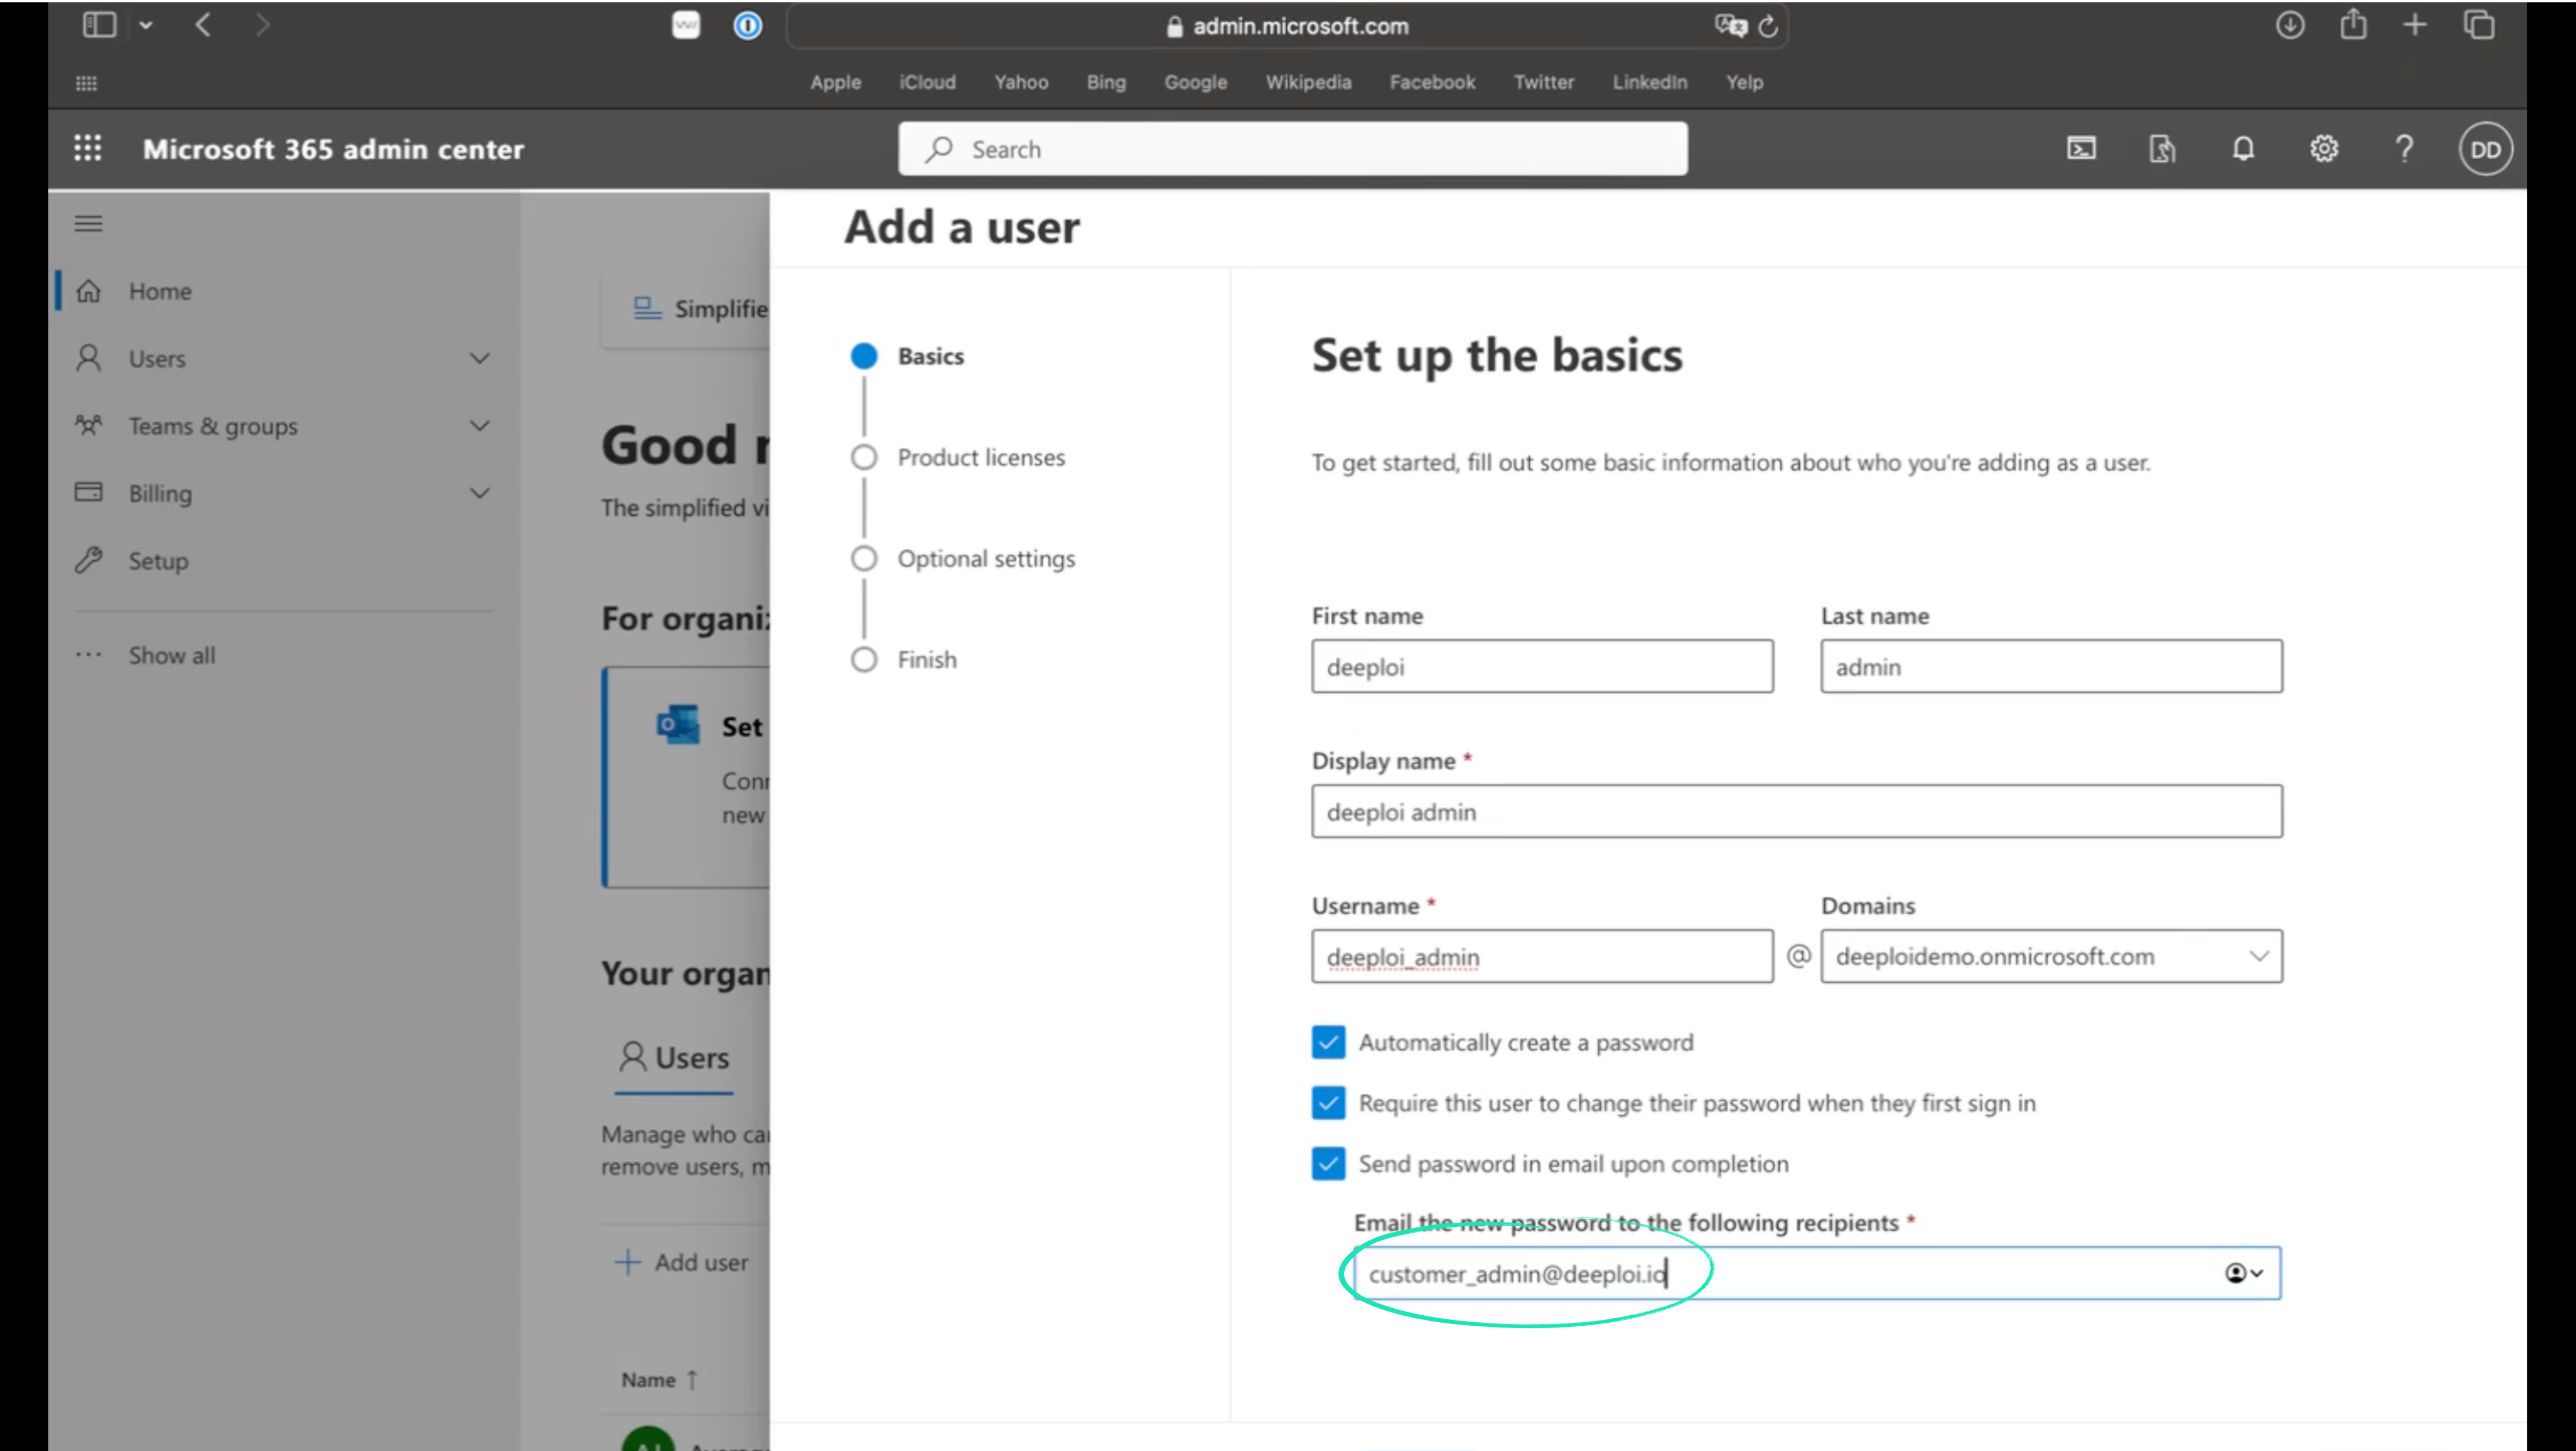
Enter the following details:
Field Value First name deeploi Last name admin Display name deeploi admin Username deeploiadmin@yourcompanydomain.com -
Check these three boxes:
- Automatically create a password
- Require this user to change their password when they first sign in
- Send password in email upon completion
In the "Email the new password to the following recipients" field, enter customer_admin@deeploi.io.
-
Select your location (for example, Germany).
-
Choose "Create user without product license."
-
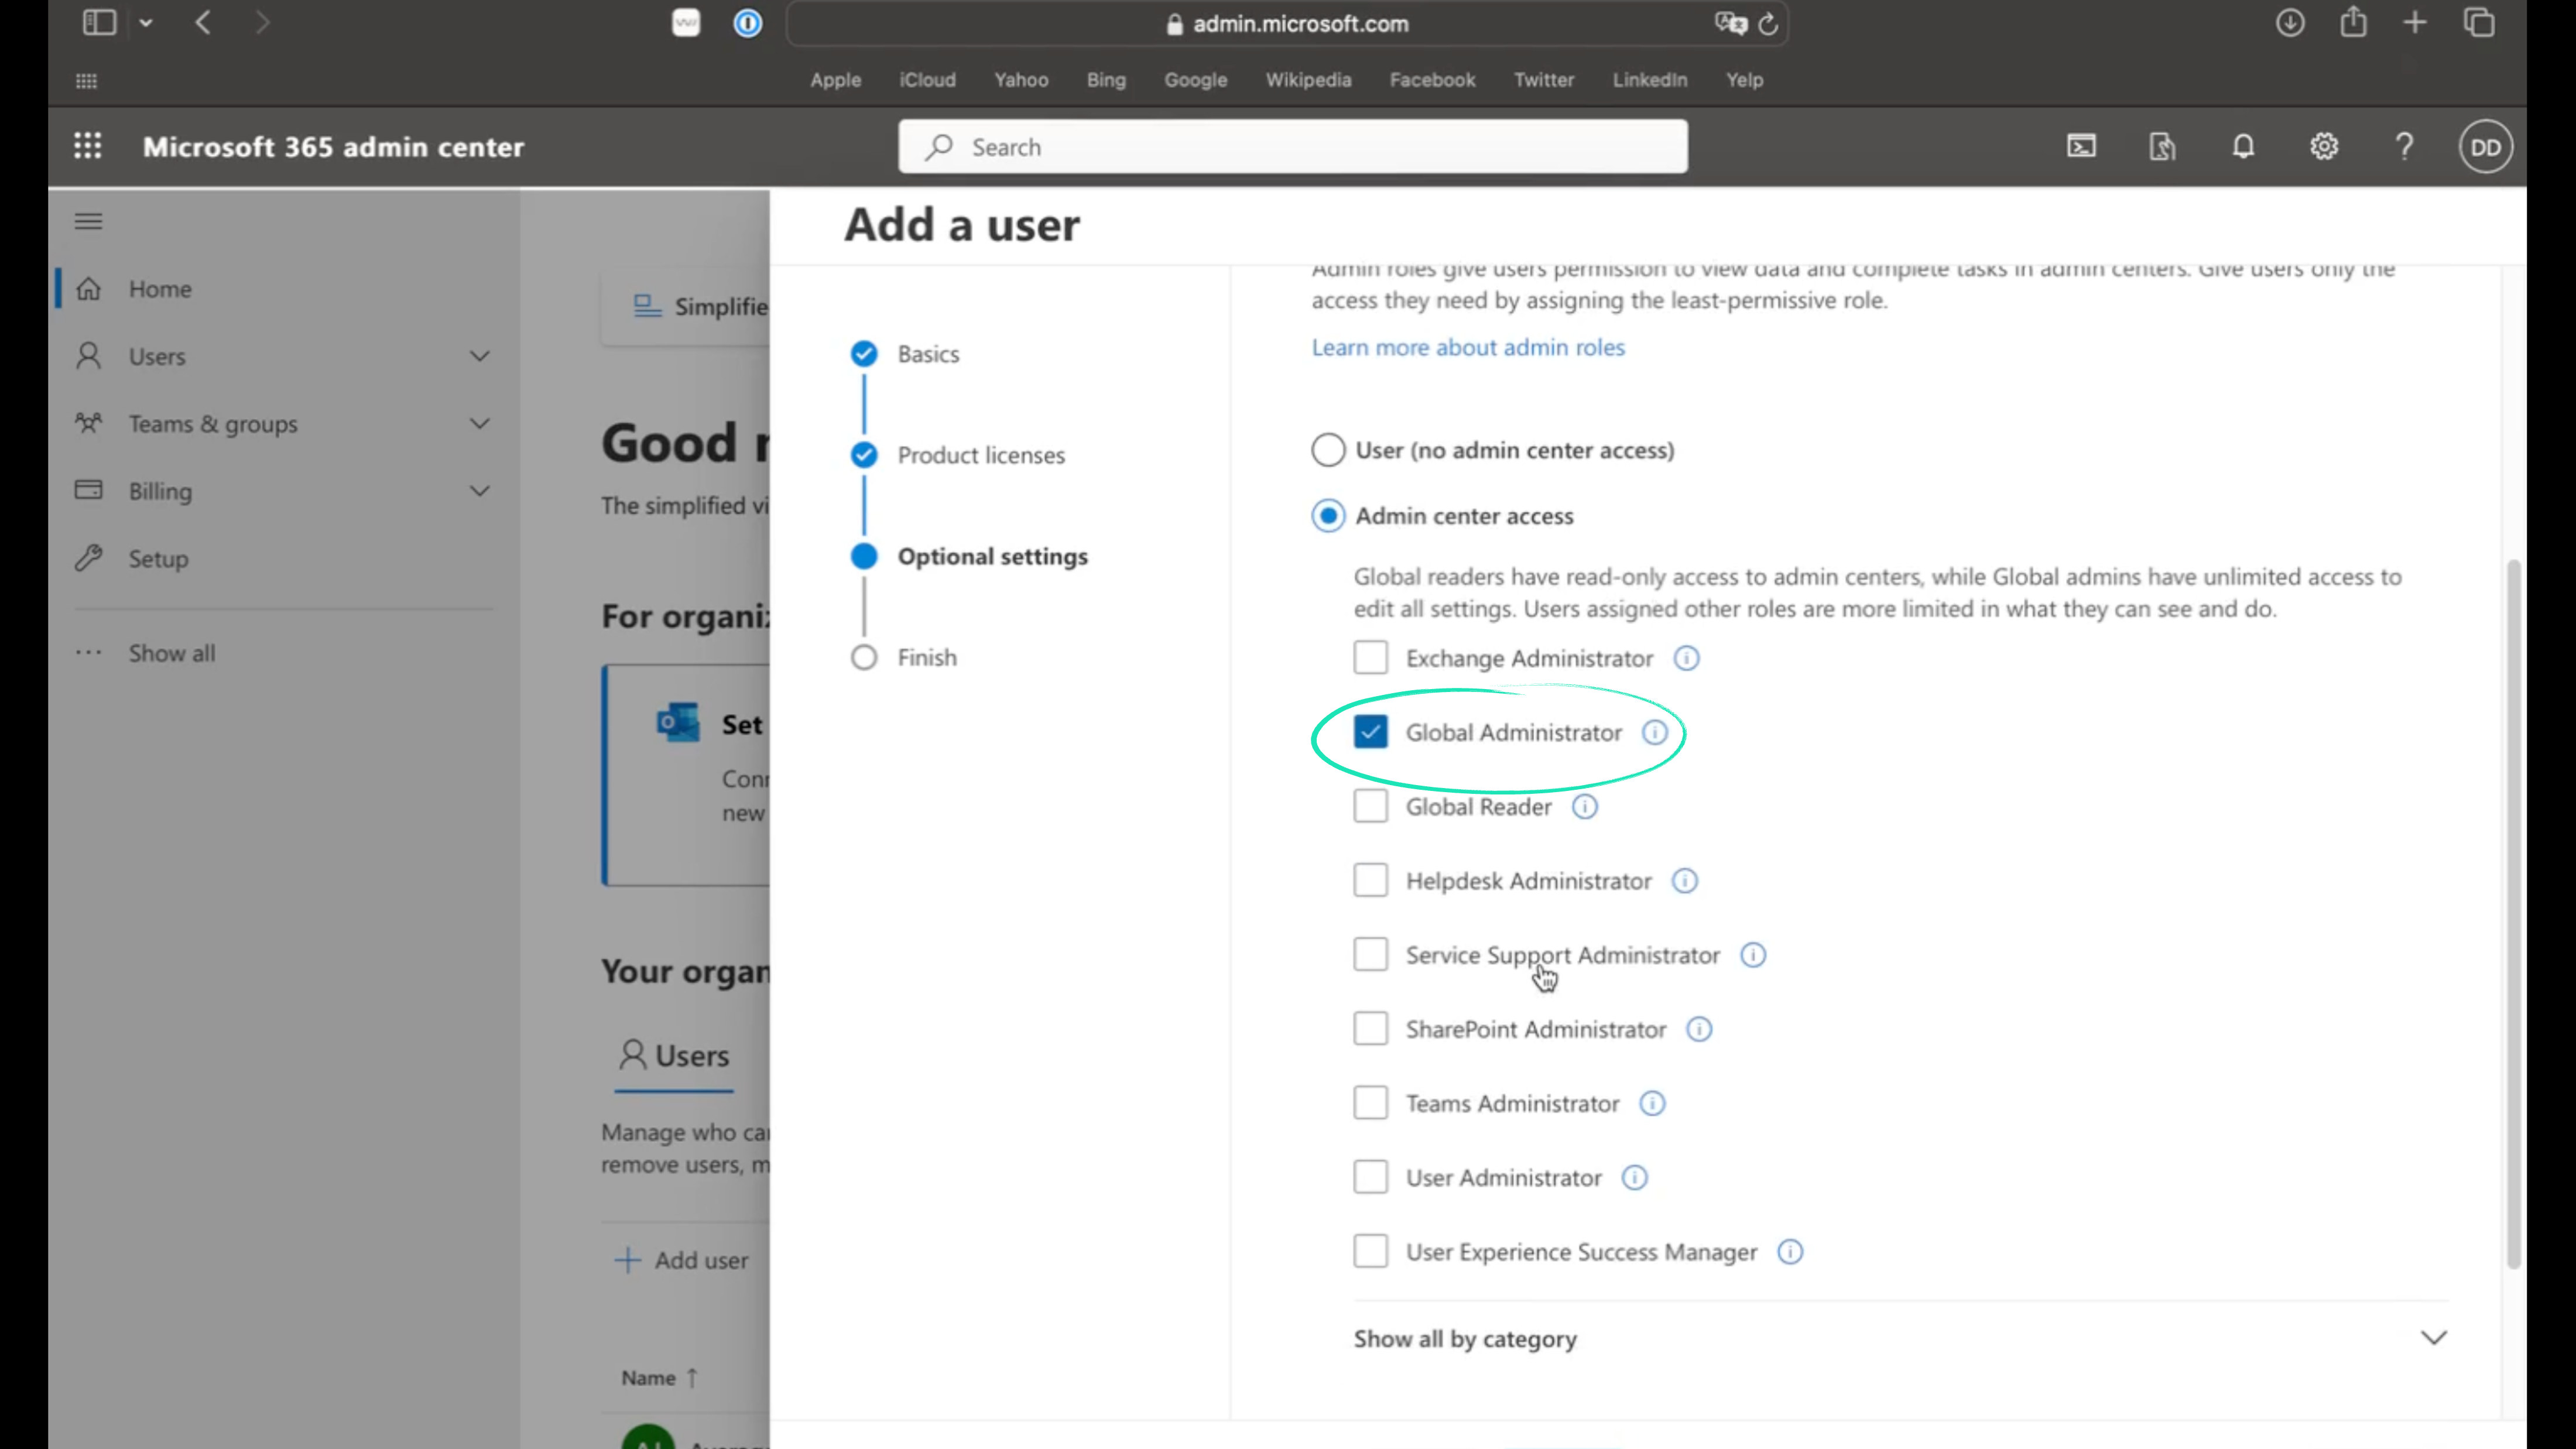
Click Admin center access and select Global Administrator.
-
Click Next, review the details, then click Finish adding.
Screenshots

Adding deeploi as a Google Workspace admin takes about 10 minutes. You will create a new user account within your company domain and assign it to the Admin Users organizational unit.
Steps
-
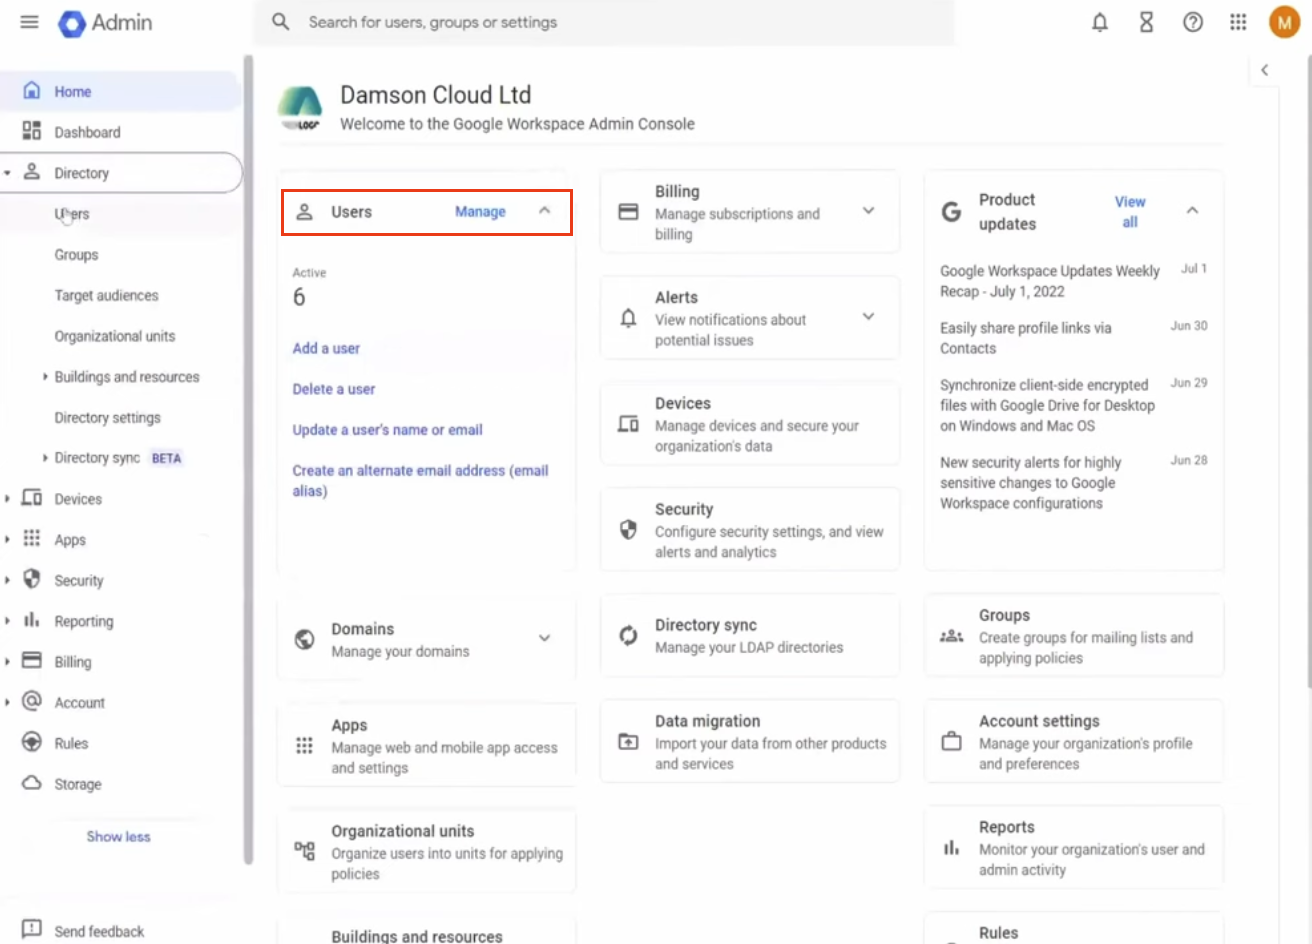
Sign in to the Google Admin Console at admin.google.com.
-
Click Users.
-
Click Add a user.
-
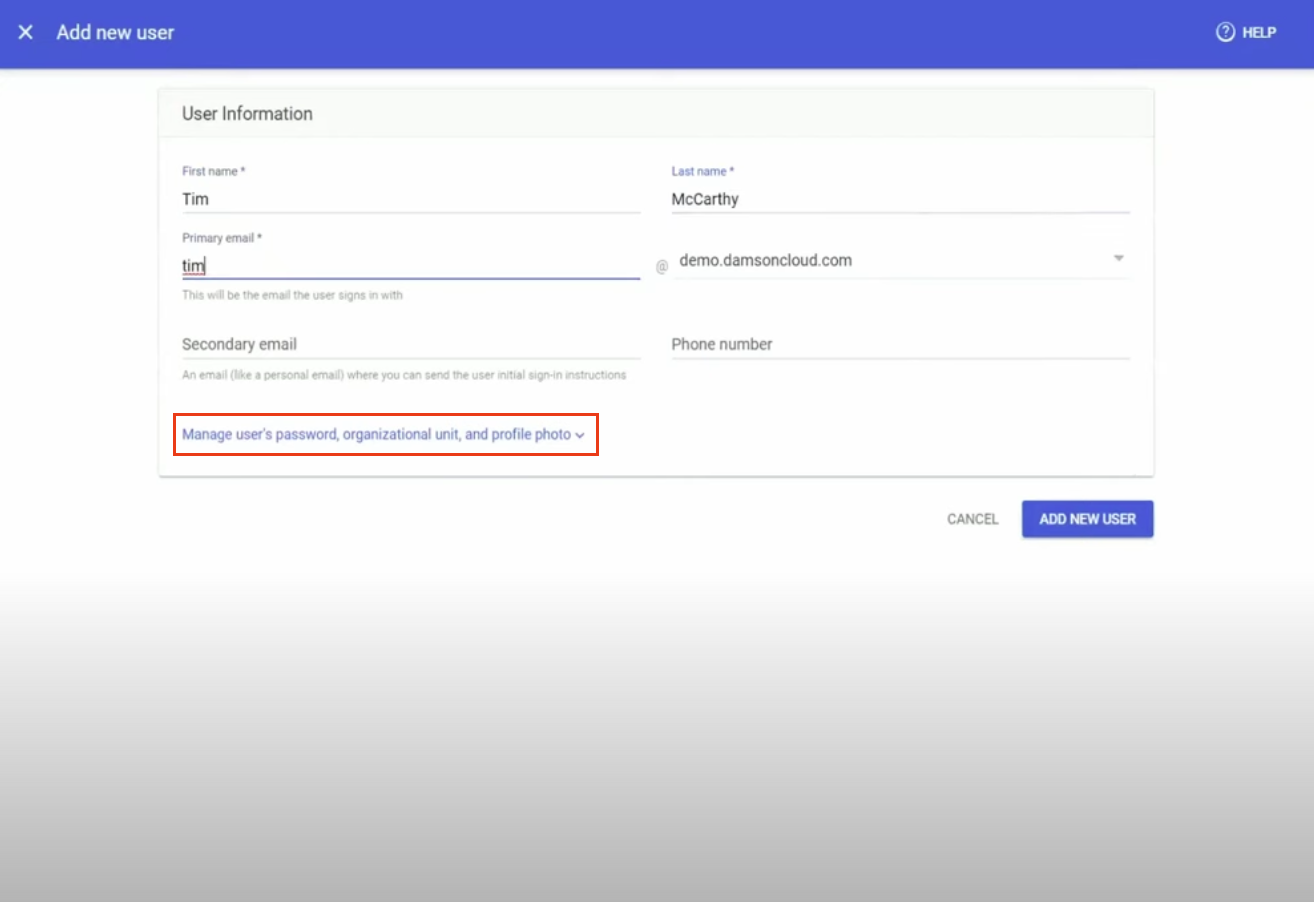
Enter the following details:
Field Value First name deeploi Last name admin Primary email deeploi@yourcompanydomain.com Secondary email customer_admin@deeploi.io -
Click "Manage user's password, organisational unit, and profile photo."
-
Set the organisational unit to Admin Users. Click the pencil icon next to the organisational unit field to change it.
-
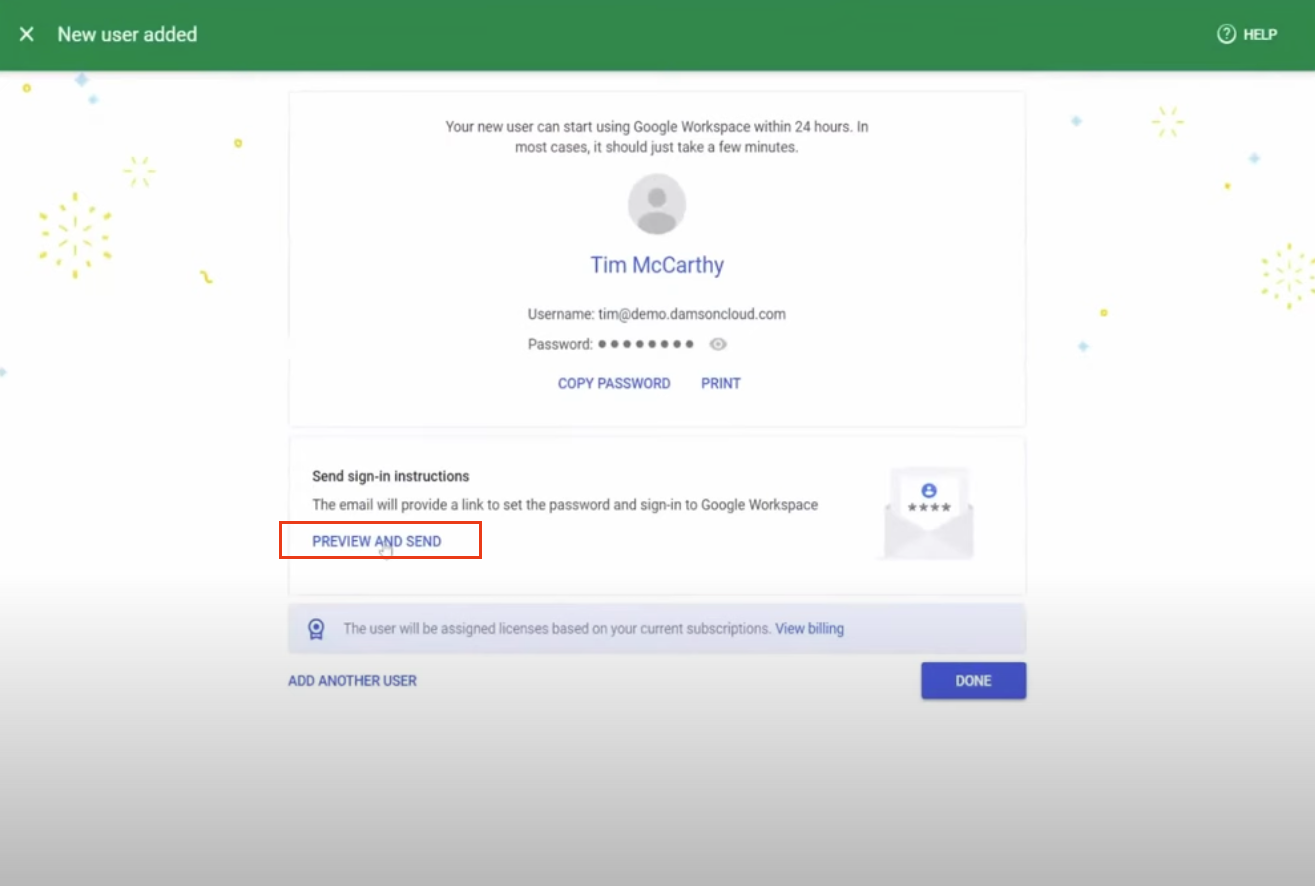
Click Add new user.
-
Under "Send sign-in instructions", click Preview and send.
-
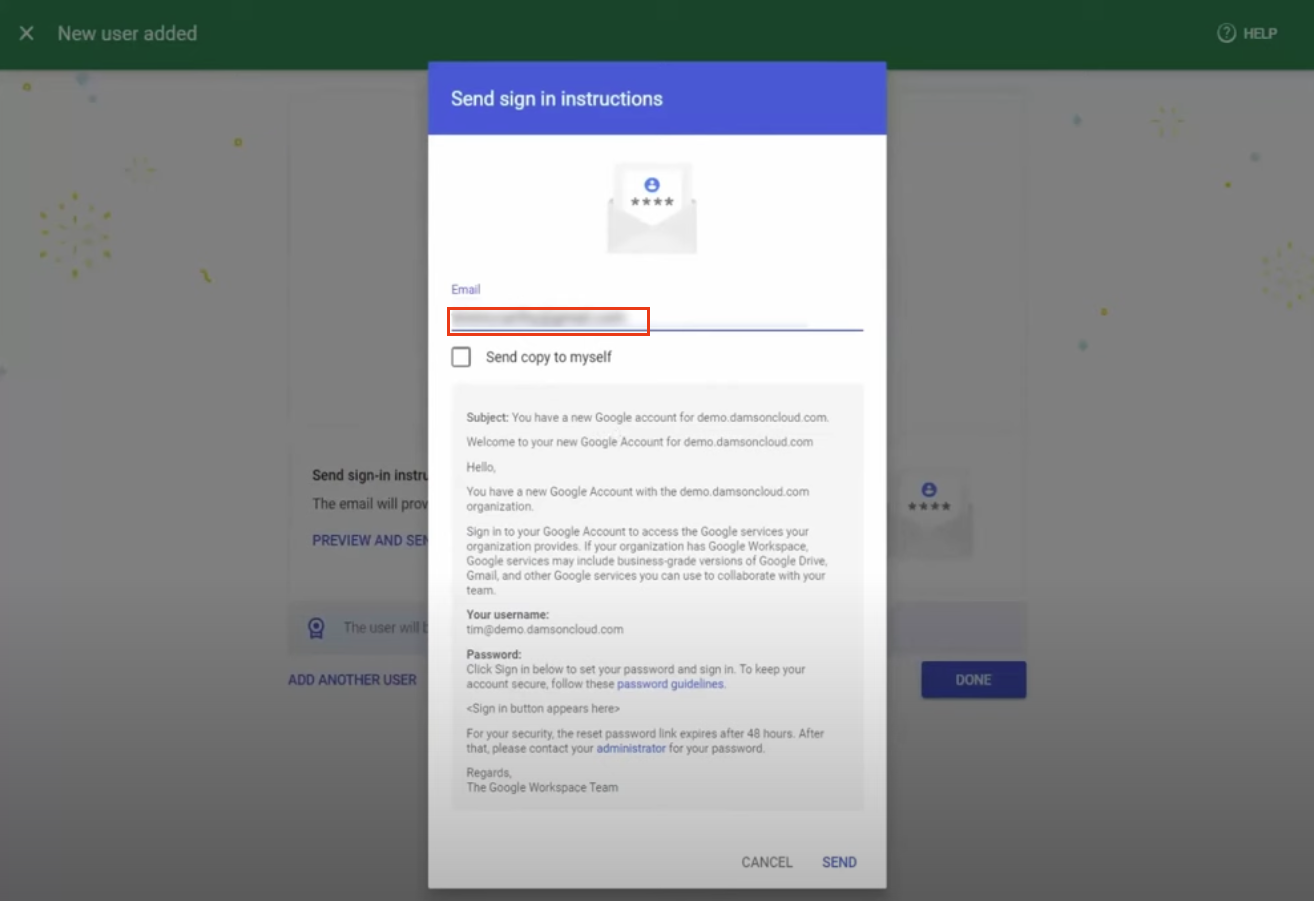
Confirm that customer_admin@deeploi.io is listed as the recipient for the sign-in instructions.
-
Click Send.
Screenshots
How do I secure my team's email?
No email security configuration is 100% effective. Stay vigilant when handling unexpected emails regardless of your settings.
Microsoft 365 includes built-in protection against phishing, malware, and spam. The settings available to you depend on whether you have Business Standard or Business Premium.
How do I access the security settings?
Go to admin.microsoft.com, then navigate to Admin Centers → Security. A new tab opens. From there: Email & Collaboration → Policies & Rules → Threat Policies.
Business Standard: recommended configuration
-
Apply Standard Preset Security Policies. Go to Preset Security Policies and select Standard Protection. This activates Microsoft's recommended baseline protection against spam, phishing, and malware.
-
Review anti-spam and anti-phishing policies. Standard policies are applied by default. Under Policies, review and adjust them to match your organization's risk profile. Microsoft's documentation covers anti-spam policies and anti-phishing policies in detail.
-
Configure quarantine policies. Under Policies → Quarantine Policies, set how users interact with quarantined emails and configure notification preferences. Microsoft's quarantine documentation covers the setup.
Business Premium: recommended configuration
Business Premium includes advanced anti-phishing controls not available in Standard. If your company handles sensitive data, Business Premium provides significantly stronger protection.
-
Apply Strict Preset Security Policies for high-risk users. Go to Preset Security Policies and select Strict Protection. Apply this to executives, admins, and others with elevated access.
-
Define trusted users and domains. In your Anti-Phishing Policies, add trusted internal users and domains. This blocks attackers trying to impersonate your staff or spoof your domain. Microsoft's impersonation insight documentation explains the options.
-
Configure Safe Links and Safe Attachments. Under Policies → Safe Links and Safe Attachments, enable real-time scanning of URLs and email attachments. Setup guides are available for Safe Links and Safe Attachments.
For broader protection, especially on macOS systems and older Windows versions, ask deeploi about the Security+ add-on. Contact hello@deeploi.io for details.
Google Workspace includes built-in protections against phishing and malware that are off by default. Enabling them reduces the risk of email-based attacks without affecting normal email usage.
Which protections should I enable?
In the Google Admin Console, go to Apps → Google Workspace → Gmail → Safety. Enable the following:
| Protection | What it does |
|---|---|
| Attachment protection | Blocks suspicious attachments and scripts from untrusted senders, and identifies uncommon file types that may contain malware |
| Links and external images | Reveals the destination behind shortened or obscured URLs, scans linked images for malicious content, and warns when clicking links to untrusted domains |
| Spoofing and authentication | Guards against domain spoofing and impersonation, flags unauthenticated emails with a visual indicator next to the sender's name |
Recommended action settings
| Threat type | Recommended action |
|---|---|
| Suspicious attachments | Quarantine |
| Suspicious links | Display warning |
| Spoofed emails | Mark as spam |
| Unauthenticated emails | Flag with visual indicator |
Additional settings
Enable Automatically turn on future recommended settings so new protections from Google are applied as they become available. Select Strongest level of protection for comprehensive coverage.
If these settings cause issues with specific email senders or workflows, Google allows per-setting adjustments. Contact hello@deeploi.io if you need help tuning the configuration.
How do I set up SSO in Google Workspace?
SSO lets your team sign in once and access all connected apps without logging in separately to each. You can use Google as the identity provider, or connect an external one such as Okta or Microsoft Entra ID.
Step 1: Choose an identity provider
Decide whether to use Google directly as your identity provider, or connect an external provider via SAML. Google maintains a list of supported SAML apps at support.google.com.
Step 2: Configure SSO in the Admin Console
- Go to admin.google.com.
- Navigate to Security → Authentication → SSO with third-party IdP.
- Add your SAML identity provider details: sign-in URL, sign-out URL, and certificate.
- Save and test the connection.
If you are using Google as the identity provider, no external SAML configuration is needed. Enable SSO with Google as SAML IdP instead.
Step 3: Assign access to users
- In the Admin Console, go to Apps → Web and mobile apps.
- Assign each app by organizational unit or group.
- Verify access for a test account before rolling out broadly.
Checklist before going live
| Item | Why it matters |
|---|---|
| Set up a backup super admin account with a recovery email not tied to SSO | If the identity provider goes down, you need a way back in |
| Enforce SSO for all users once tested | Avoids a split configuration where some users bypass SSO |
| Pair SSO with Google 2-Step Verification | SSO alone is not sufficient; 2-factor authentication is a separate control |